
- Web-admin home page
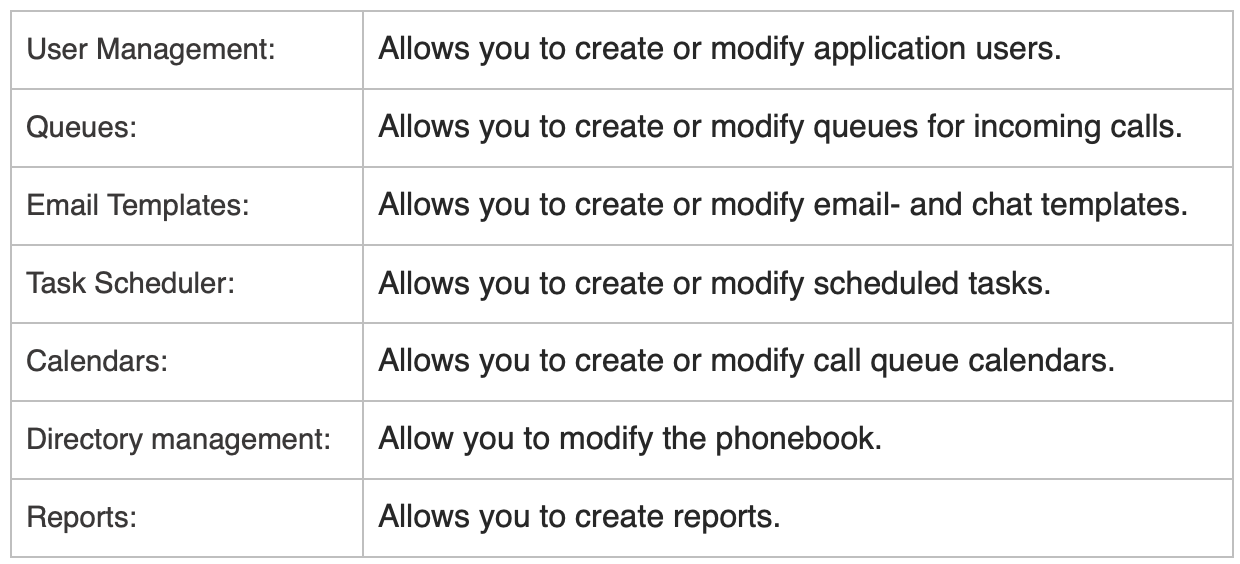
The web-admin home page contains access to various configurable items. Most items are only accessible for users with a supervisor or administrator role. The application management panel contains the following items:
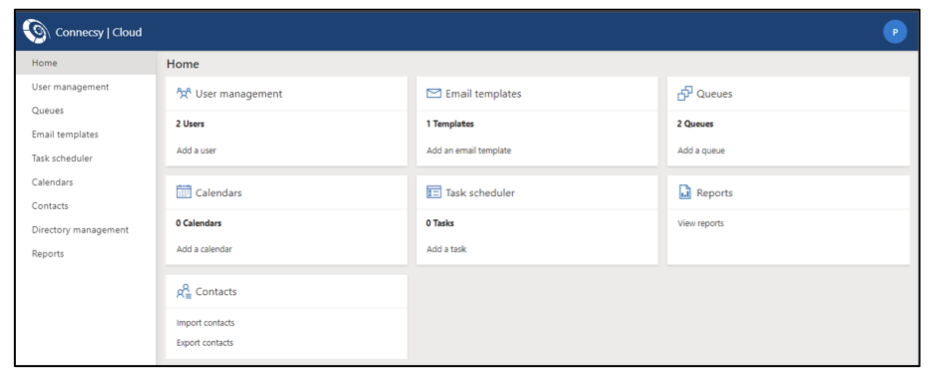
The home page shows available dialogue through a grid of tiles. The following actions can be initiated from this page:
Attention: Note that not all items may be visible, depending on the connected platform. At the top right of your screen, you will see your avatar, when you click the avatar, you are able to change your language and logout of the Web-admin.
2. User Management
Your user account has a role as either attendant, supervisor, or system administrator. The role will determine the rights and functionality within the Web-client and Web-admin application.
With the attendant role you can perform all contact handling tasks such as answering and transferring calls.
With the supervisor role you can in addition to the user role run reports and maintain the email- and chat templates. A supervisor can also change the actual queue status by opening or closing incoming call queues.
With the administrator role you can in addition to the supervisor role create or modify user accounts and assign roles.
2.1 Add or modify a user account
A new user account can be created by clicking the Add a user button. Existing user accounts can be edited by selecting the user account from the list.
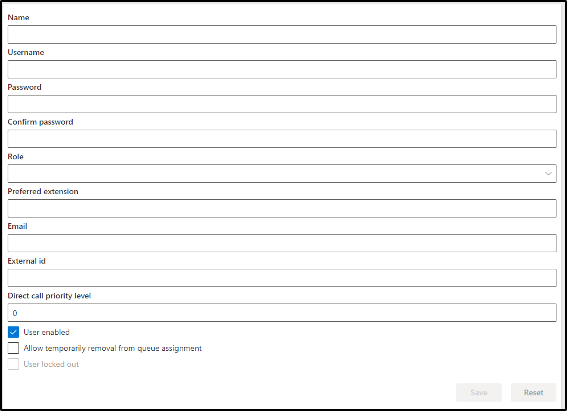
User accounts are defined by:
Name: This is a descriptive name that is shown throughout the application, on other attendant applications and within the reports
Username: This is the name that is used upon login.
Password: Defines the user password. Note that the password should match the password policy as defined by the system administrator.
Confirm Password: Re-enter the password as filled in by Password to confirm and validate.
Role: Defines the user role as system administrator, supervisor, or regular user.
Preferred Extension: Extension used as callbacknumber. When using web-client this must be defined for attendants.
Email: Not needed at the moment.
External ID: Not needed at the moment.
Direct Call Priority Level: Defines the call priority level of a call that's been offered to the attendant directly respective to other queued calls.
User enabled: When checked it is possible to log in to the application. When unchecked access to the application is prohibited.
User is Locked Out: Gets checked after several unsuccessful log in attempts. When locked out it is not possible to log in to the application anymore, regardless of whether the correct password was entered. An administrator can remove the check from this value so that the user can log in again.
Allow temporarily removal from queue assignment: When checked the user can temporarily remove him-/herself from the queues that he/she has been assigned to.
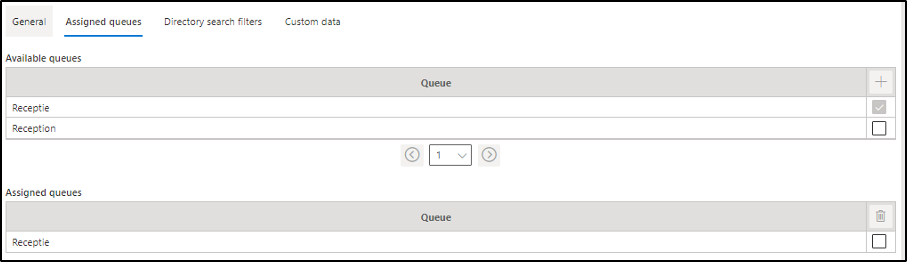
When a user has been created the next tabs will be seen, and queues can be assigned to the user.
Username: This is the name that is used upon login.
Password: Defines the user password. Note that the password should match the password policy as defined by the system administrator.
Confirm Password: Re-enter the password as filled in by Password to confirm and validate.
Role: Defines the user role as system administrator, supervisor, or regular user.
Preferred Extension: Extension used as callbacknumber. When using web-client this must be defined for attendants.
Email: Not needed at the moment.
External ID: Not needed at the moment.
Direct Call Priority Level: Defines the call priority level of a call that's been offered to the attendant directly respective to other queued calls.
User enabled: When checked it is possible to log in to the application. When unchecked access to the application is prohibited.
User is Locked Out: Gets checked after several unsuccessful log in attempts. When locked out it is not possible to log in to the application anymore, regardless of whether the correct password was entered. An administrator can remove the check from this value so that the user can log in again.
Allow temporarily removal from queue assignment: When checked the user can temporarily remove him-/herself from the queues that he/she has been assigned to.
When a user has been created the next tabs will be seen, and queues can be assigned to the user.

2.2 Assigned queues
The user can handle multiple queues. To assign queues to a user account select the queue in the available list, and press the + button. The queue is then added to the assigned queues list. The user will from now on receive calls from this queue.
To remove a queue assignment, select the assigned call queue and press the unlink button.
The user will now not receive calls from this queue anymore.
To remove a queue assignment, select the assigned call queue and press the unlink button.
The user will now not receive calls from this queue anymore.
2.3 Directory search filters
It is possible to define here directory search filters on a user basis.
2.4 Custom data
It is possible to define here custom data fields
2.5 Deleting a user account
User accounts can be deleted by selecting the user account and clicking the Delete user button. This will mark the user account as deleted so that the user cannot log in to the application anymore.
To completely delete the user from the system toggle “Show deleted user” from the “User management” view and select “Delete permanently”. Now the user and all the call history of that user is removed. In this same view it is also possible to restore a deleted user.
To completely delete the user from the system toggle “Show deleted user” from the “User management” view and select “Delete permanently”. Now the user and all the call history of that user is removed. In this same view it is also possible to restore a deleted user.
3. Queues
The Queues define all call queues which can be handled by the operator. You can see which calls will be offered to you and you are able to pick-up and answer a call from the queue.
The Queues view allows a user with a system administrator role to create or modify queues for incoming calls.
The Queues view allows a user with a system administrator role to create or modify queues for incoming calls.
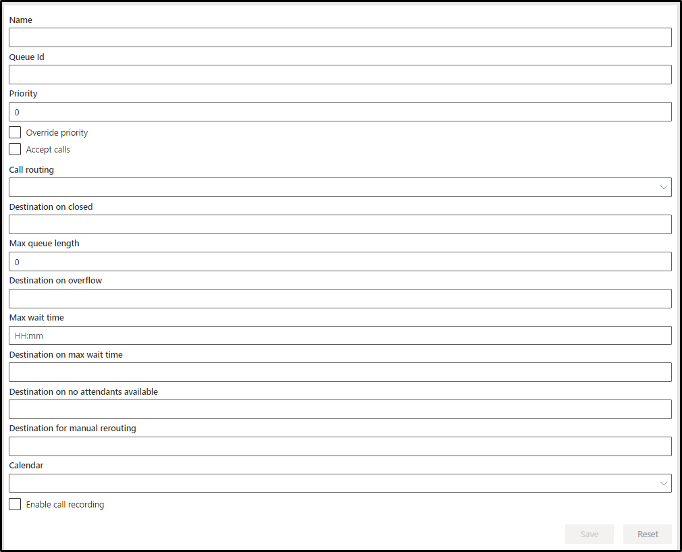
3.1 Add or modify a queue
A queue can be created by clicking the Add a queue button. Existing queues can be edited by selecting the queue from the list.
Queues are defined by:
Queues are defined by:
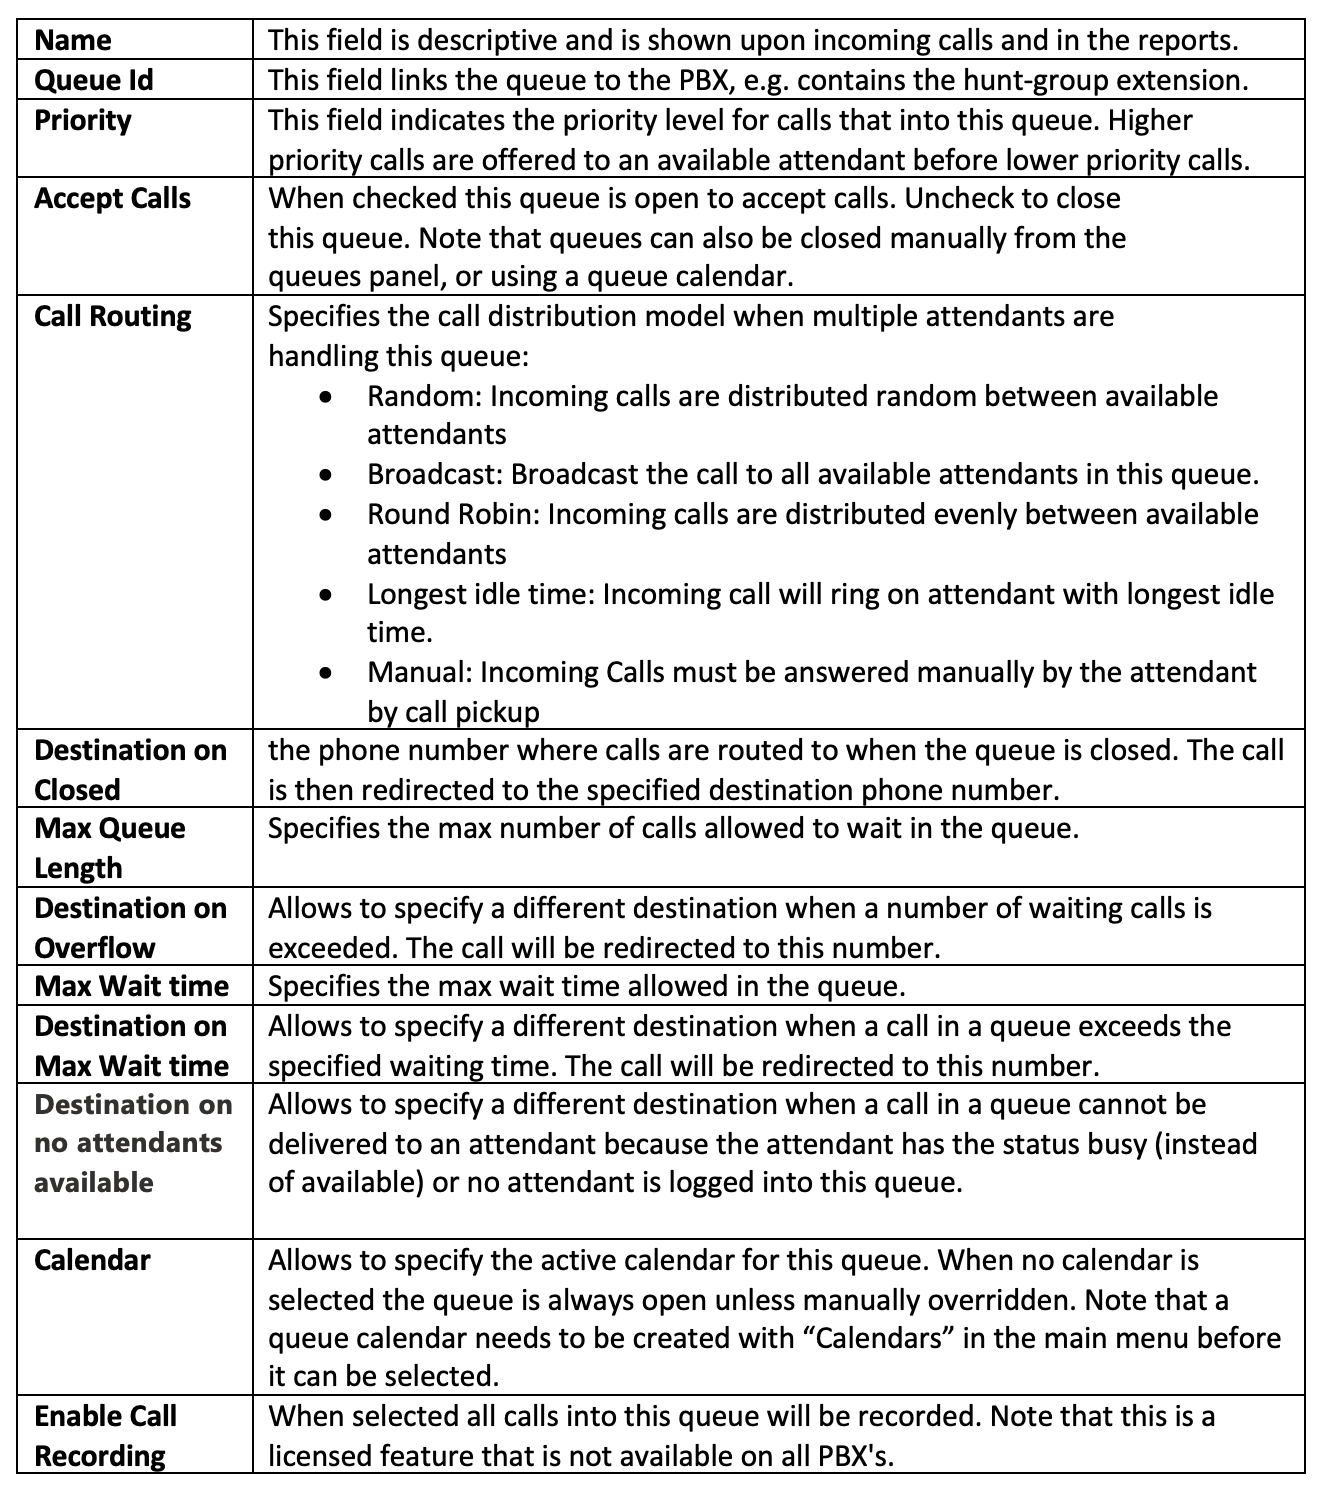
A queue can be entitled as the default queue using the button Default. Calls that do not have queue information will get queued into the default queue. This setting only applies to certain PBX systems.
4. Email Templates
Email templates are used to compose a new email message with or without an active call. The template allows to enter content for the subject and body text, as static text or from parameter values that can refer to the contact entry or active call.
A user with an admin role can administer the available email and chat templates. The email template panel is opened from the dashboard or from the menu item when clicking an email icon on a contact.
A user with an admin role can administer the available email and chat templates. The email template panel is opened from the dashboard or from the menu item when clicking an email icon on a contact.
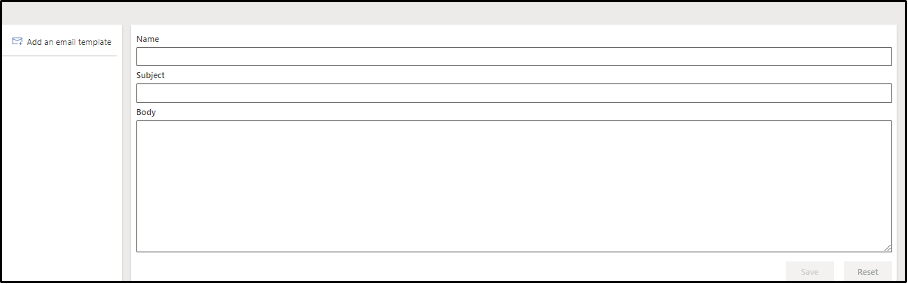
4.1 Adding or modifying a template
A new email template can be added by clicking the Add an e-mail template button. Existing templates can be edited by selecting the template from the list.
Templates are defined by:
Templates are defined by:

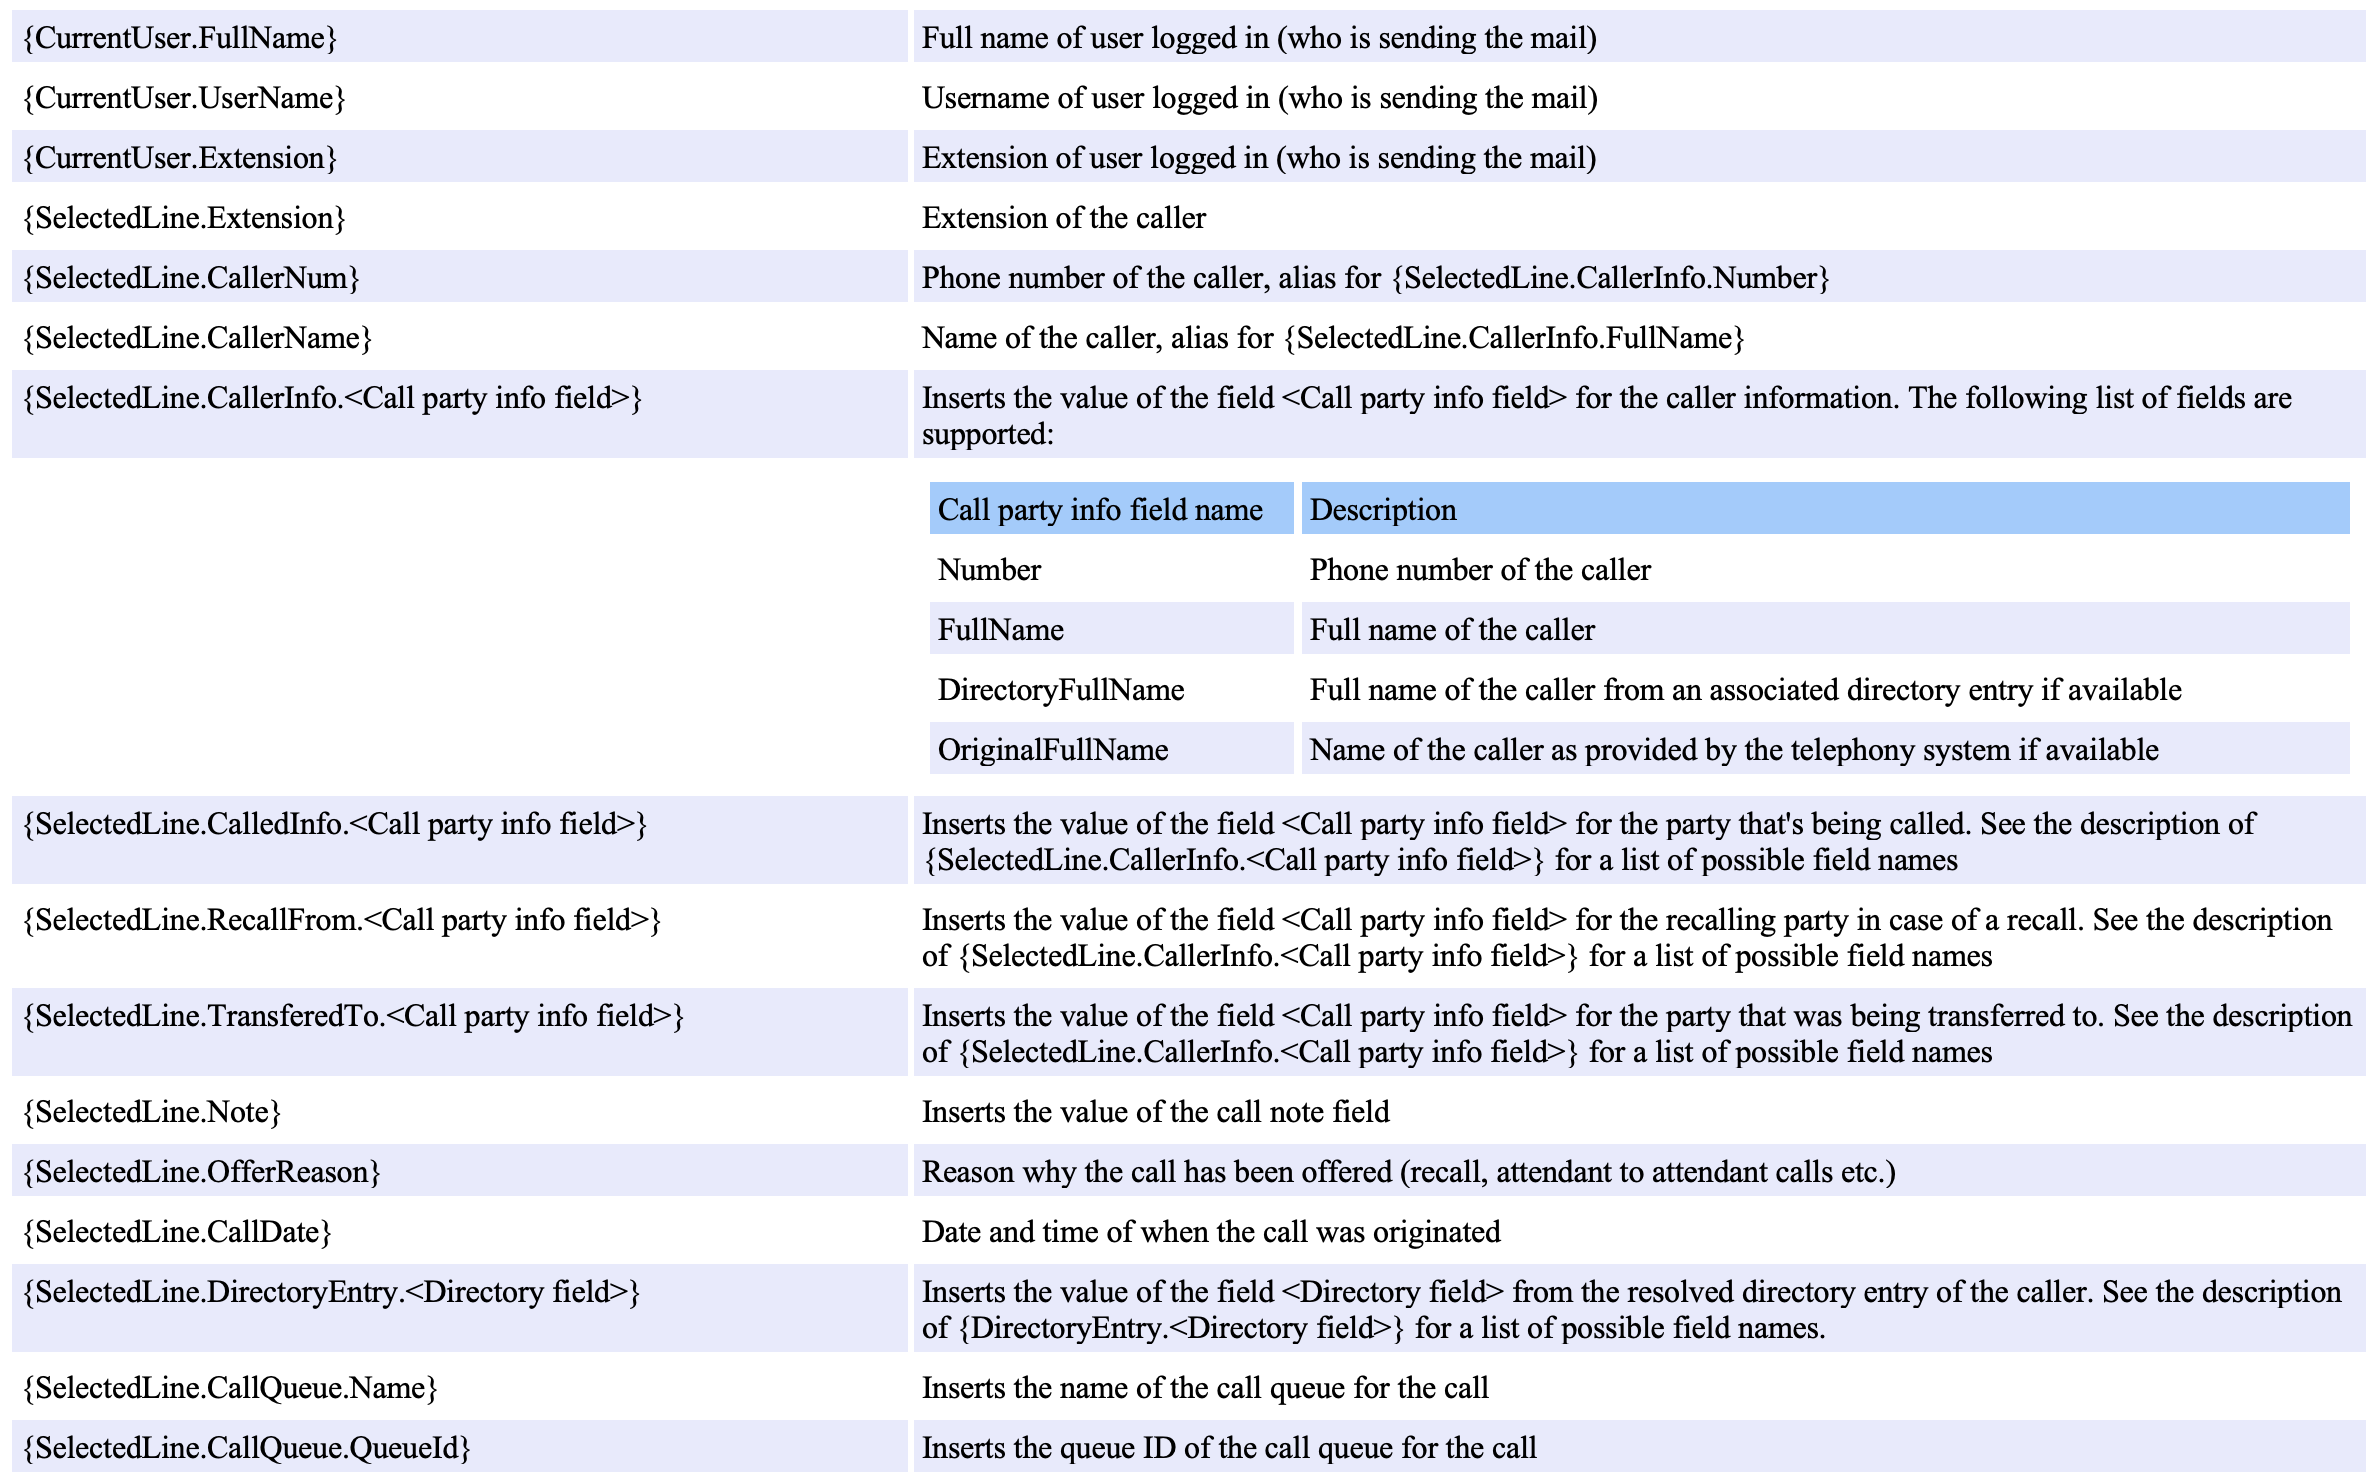
4.2 Message parameters
The template subject and body text can contain both literal text as well as parameters that are replaced by the actual content at the moment the template is used in an email or chat session.
When a parameter isn't available at the time of sending the message, it will be left empty, i.e. when sending an email when not in a call, the selected line is empty, and so are all those parameters.
When a parameter isn't available at the time of sending the message, it will be left empty, i.e. when sending an email when not in a call, the selected line is empty, and so are all those parameters.

Please, note that when an incorrect template body is specified the input dialog will show "Input string was not in a correct format". The save button will be disabled in such case.
4.3 Deleting an email template
Email templates can be permanently deleted by selecting the template and clicking the Delete email template button.
5. Task Scheduler
The task scheduler allows you to view, create or modify scheduled maintenance tasks. Task can be defined for directory synchronization.
5.1 Create new import task
To create a new import task, click Add a task. Depending on the license you can add the following tasks
The task definition screen has panels for generic and task specific properties.
Generic properties:
- RingCentral contact import1
- Google contact import
- Azure contact import
The task definition screen has panels for generic and task specific properties.
Generic properties:

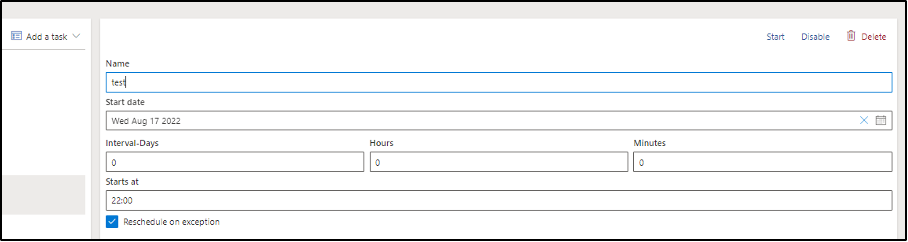
5.2 Reschedule on exception
This check box can be unchecked (default is checked). Uncheck when you want a task to get disabled when an exception occurs during running of the task.
The task can be manually started, enabled, disabled or deleted using the command buttons. The panel also shows the time of the latest task execution.
The task can be manually started, enabled, disabled or deleted using the command buttons. The panel also shows the time of the latest task execution.

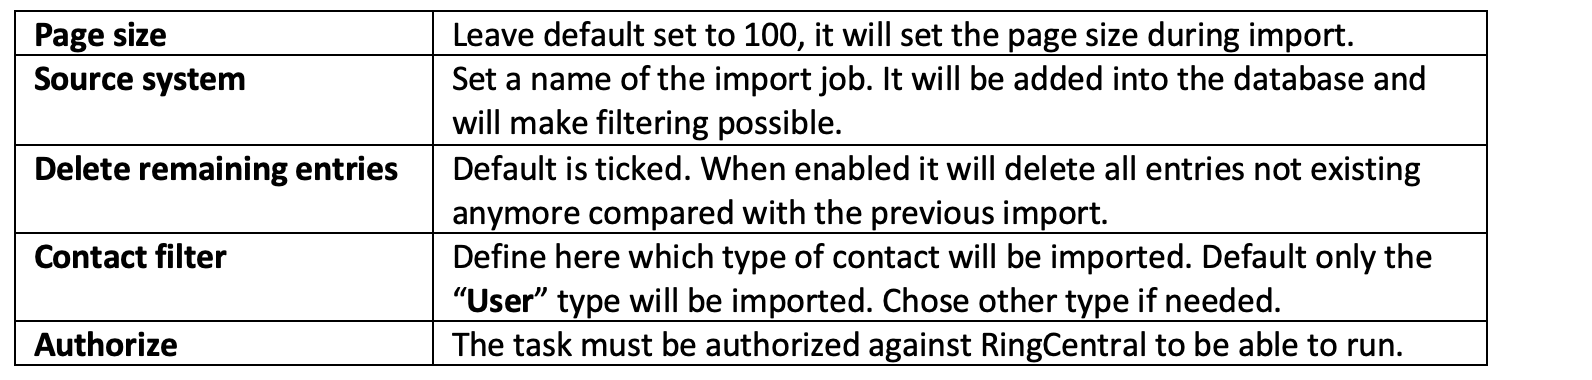
5.3 RingCentral contact import
For configuring the RingCentral contact import the following fields must be filled in.
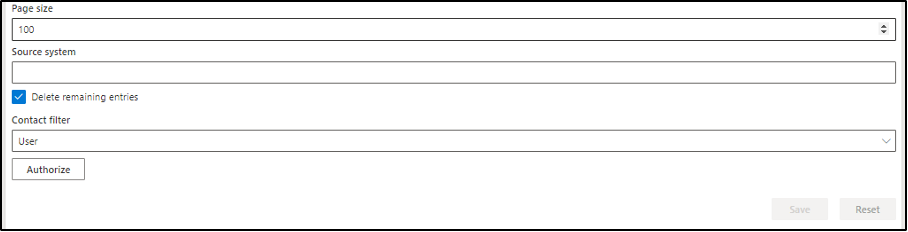
RingCentral properties:
5.4 Google contact import
To be able to use this import within Google an application must be defined and from this application the client ID and client secret must be used.
For configuring the Google contact import the following fields must be filled in.
For configuring the Google contact import the following fields must be filled in.

Google properties:

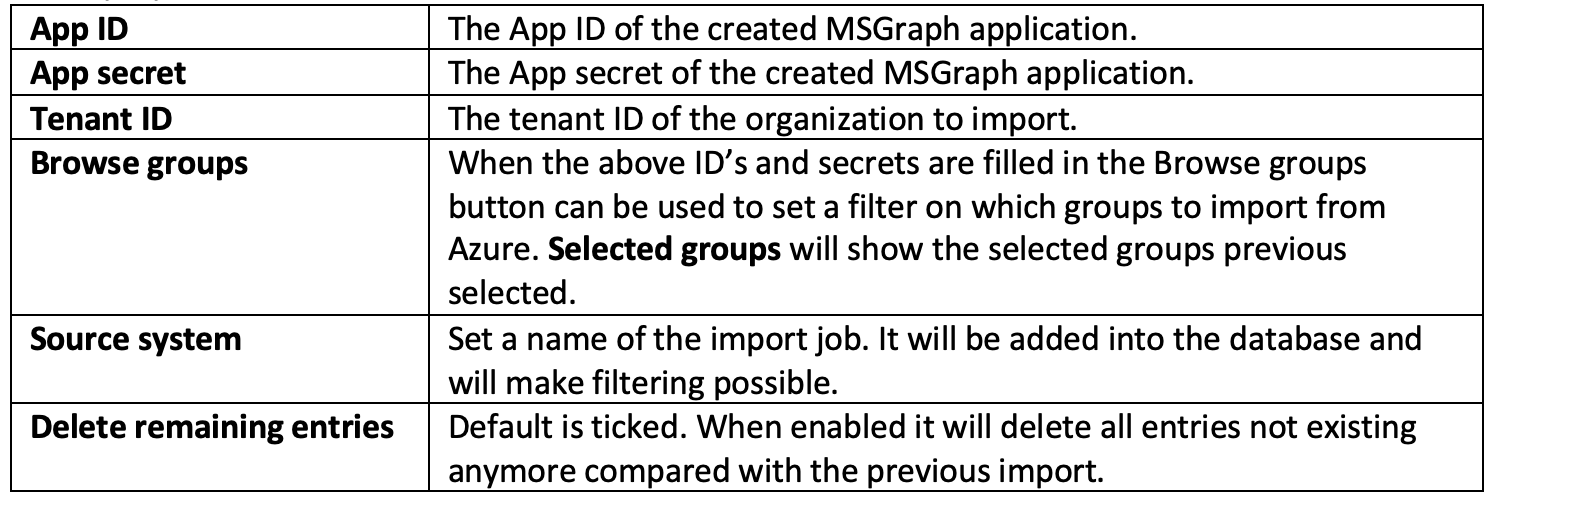
5.5 Azure contact import
To be able to use this import a MSGraph application must be defined in the Azure tenant.
For configuring the Azure contact import the following fields must be filled in:
For configuring the Azure contact import the following fields must be filled in:

Azure properties:
6. Calendar
Our calendar functions allow a user to create or modify queue calendars. With a queue calendar it is possible to define open and closing times for call queues.
6.1 Add or modify a calendar
A queue calendar can be created by clicking the Add a calendar button. Existing calendars can be edited by selecting the calendar from the list.
Below example will only open the queue where it is assigned from Monday till Friday 08:00 till 17:30.
Below example will only open the queue where it is assigned from Monday till Friday 08:00 till 17:30.
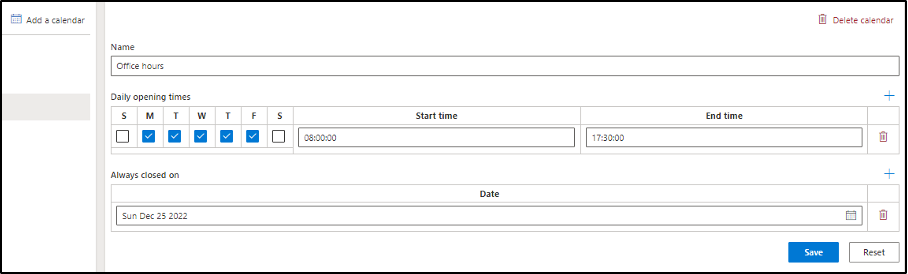
Queue calendars are defined by:
Name
This is a descriptive name that will be shown in the Calendar dropdown field on the queue management form.
Daily Opening Times
Specifies time ranges and days when a queue is open. Multiple ranges can be specified. The opening times may combine from several lines. For example, to specify all days open between 9-12 and 13-17 except Sundays and Saturday only in the morning enter 2 lines:
Line 1: All days except Sunday from 9 to 12
Line 2: All days except Sunday and Saturday from 13 to 17
Always close on
Allows to explicit specify a date when the queue is closed. Use this field to close the queue on days like bank holidays or Christmas.
7. Contacts
The directory can be imported from a formatted comma separated text file (CSV).
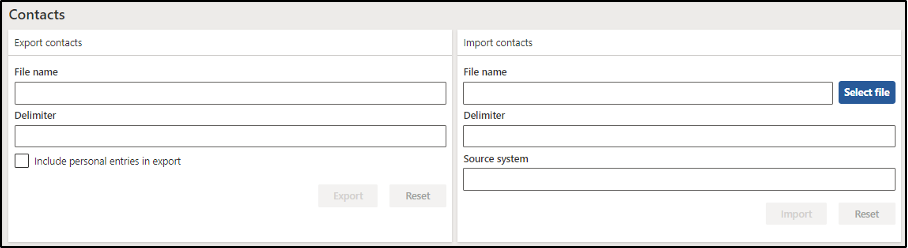
7.1 Import contacts
Open the upload form using the button Select fileunder import contacts
Select the CSV data file. Note that the field separator should be specified in this form as
Well in the Delimiter column. Common values are a comma or semicolon. The default value is retrieved from the Region and Language settings as specified in the OS.
Press the button Import. The data file is now uploaded to the server and will be parsed. The progress can be monitored in the task scheduler.
Please, note that during the actual upload of the CSV data file the directory is locked.
TIP!
First create an export to see the file format structure.
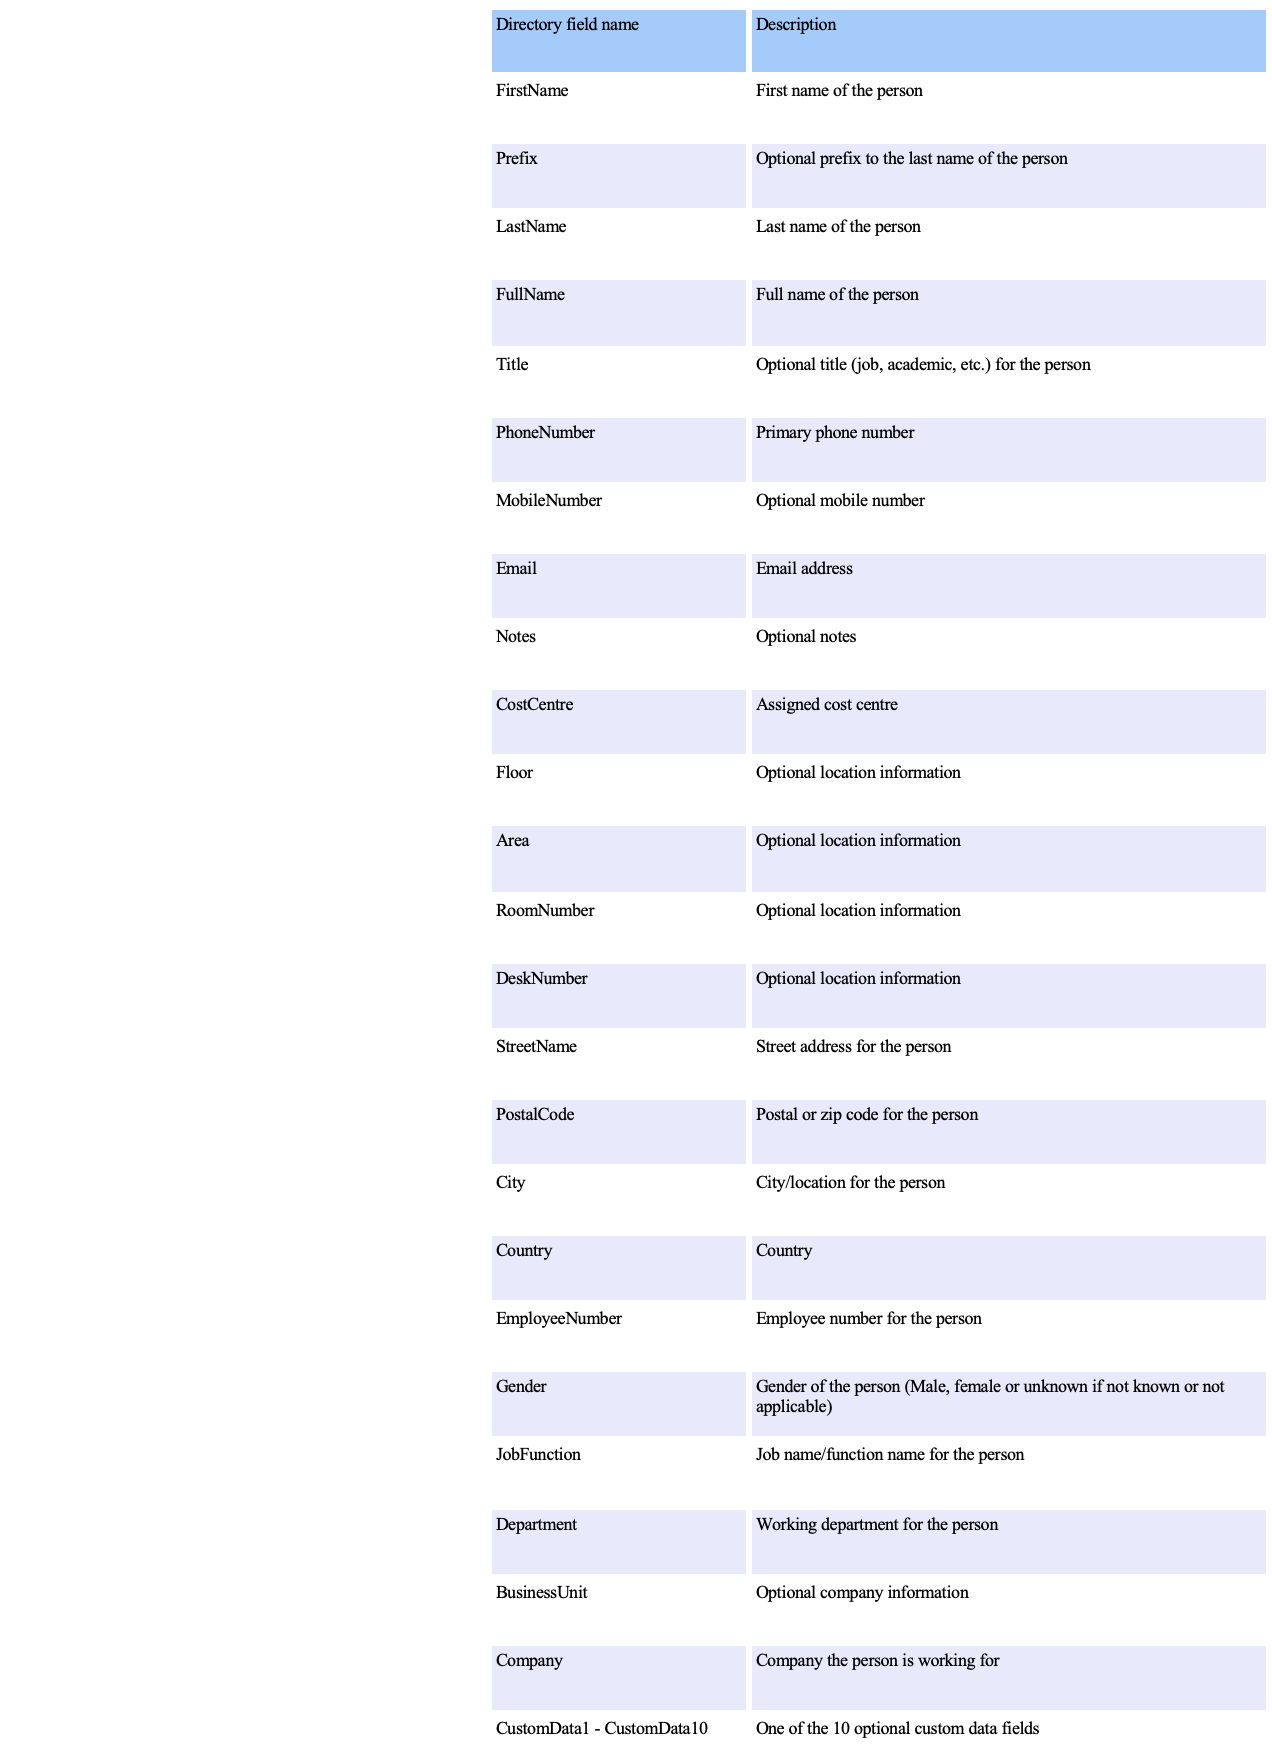
7.2 File format
The first line of the file must be the header line. Column names or case-insensitive and any column not listed here is ignored. Invalid data in a column causes that data to not be imported. As long as at least one column has valid data, the import process tries to add it to the Directory, providing the entry passes all validation.
7.3 Export contacts
Directory data can be exported to a comma separated data file (CSV) for example to create a backup or to manually edit the data in Microsoft Excel. After editing the CSV data file it can be imported into Connecsy Enterprise again.
Specify the filename for the export.
Specify the field delimiter. Common values are a comma or semicolon. The default value is
retrieved from the Region and Language settings as specified in the OS.
Press the Exportbutton.
The exported data file will contain all columns including the ExternalId column.
Please note that the ExternalId field is filled with a pseudo key if no external key has been specified. When importing this data file, the changed records get properly updated. When the ExternalId value is not present or does not match the original values, these rows cannot be matched with the existing directory entry and thus a new record will be created in the directory. This might lead to duplicate information.
8. Directory Management
Here you will be able to view, edit or deleted record in the Connecsy cloud database. Be aware that records imported via the task scheduler will overwrite your changes.
9. Reports
Connecsy cloud provides integrated reporting on attendants, queues, and calls details. Reporting is started from the Reports option in the main window. This will start the reporting window. In this window you can select the report and provide the report parameters.
The following reports are provided:
The following reports are provided:
- Abandoned calls while in queue
- Call statistics per attendant
- Call history Details
- Incoming calls per day
- Number of calls per queue
- Time-based call statistics per attendant
- Transfers from Attendants
- User Sessions
9.1 Abandoned calls while in queue
The abandoned calls while in queue report shows the queues and the amount of callers that have left while in queue.
9.2 Call history details
This report shows the call details within each queue from the given start date. It also display the call duration and the status, as well as the call note.
9.3 Number of calls per queue
Display the number of calls per queue between the start- and end date.
9.4 User sessions
This report shows the details for each attendant user session between the start- and end date and for the selected attendants. It displays the session duration and the time spent in call.
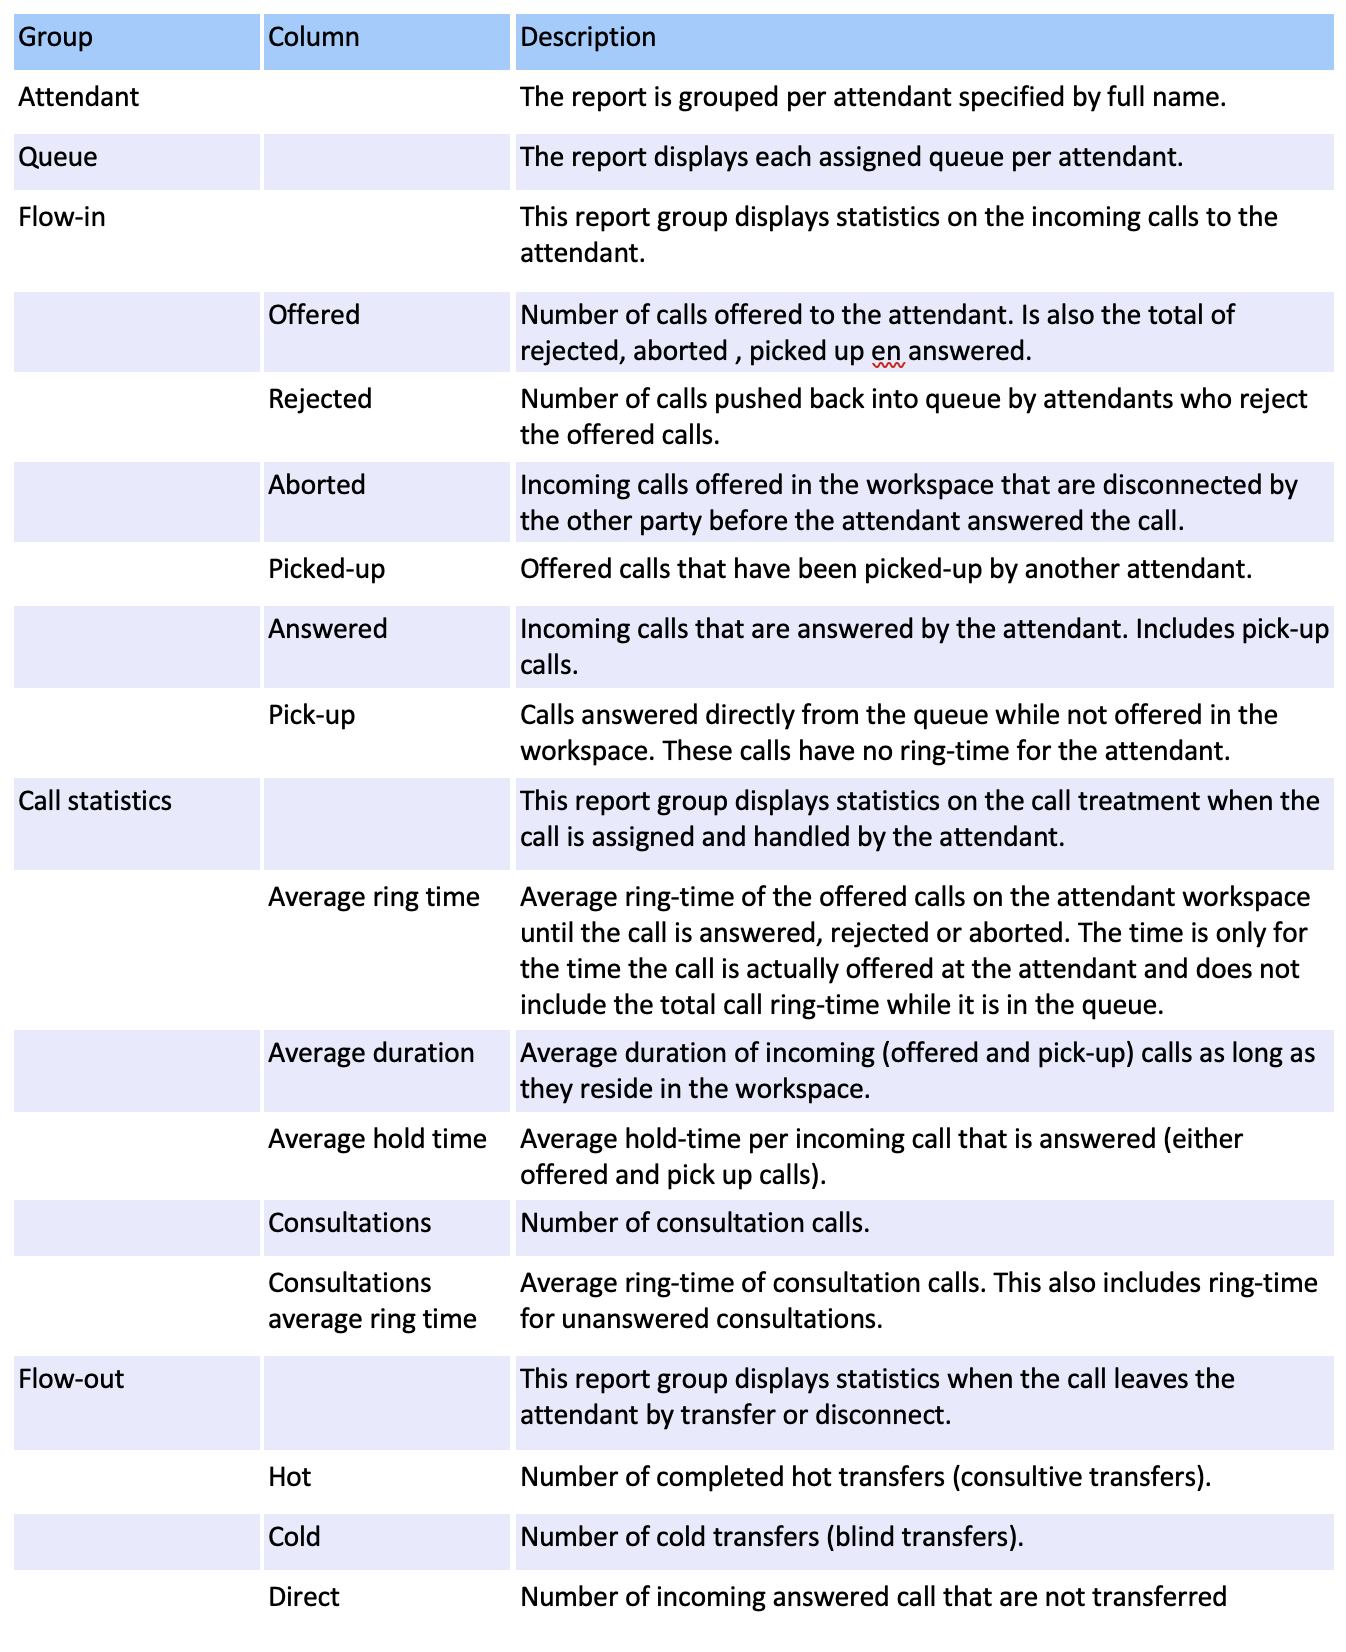
9.5 Call statistics per attendant
The report "Call Statistics per Attendant" displays the incoming call statistics per individual attendant and queue within the specified start-date and end-date.
The report displays the following information:
The report displays the following information:

9.6 Time-based call statistics per attendant
The report "Time-based Call Statistics per attendant" displays the incoming call statistics per individual attendant and hourly interval.
Input Parameters:
Input Parameters:
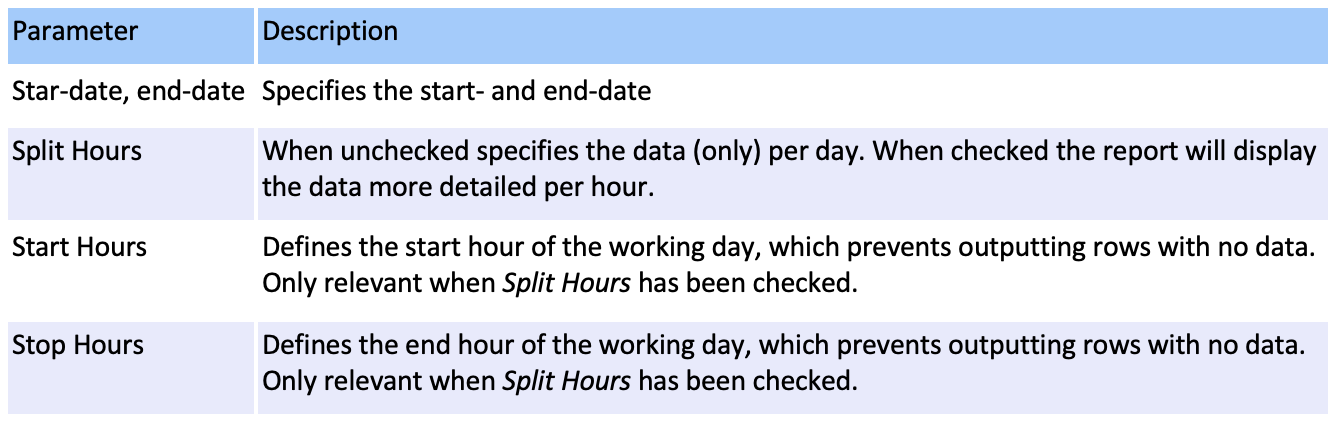
The report displays the following information:
9.7 Printing or exporting a report
The report can be exported to file in various formats such as PDF or Excel by:
- Select and generate the report
- Click the Export / Save As dropdown button and select the required output format. This will bring up a save file dialog where you can enter the required filename and storage location.
10. Call Park Location
Connecsy uses RingCentral public parking spots to park a call. By default all parked calls initiated by Connecsy are visible inside the parking list of all logged on attendants.
Location based parking enables to limit the visibility parked calls inside the parking list of a logged on attendant user to only those call that are parked by an attendant user that has been assigned to the same location as that of the logged on attendant user. For example: say attendant Monique has been assigned the location “Amsterdam”. If attendant Peter - which has also been assigned to location “Amsterdam” parks a call, it will be visible in the parked call lists of both Monique and Peter. But if attendant Esther who has been assigned to location “Zeist” parks a call, it will only be visible to the attendants assigned to location “Zeist” and not to Monique and Peter.
Location based parking enables to limit the visibility parked calls inside the parking list of a logged on attendant user to only those call that are parked by an attendant user that has been assigned to the same location as that of the logged on attendant user. For example: say attendant Monique has been assigned the location “Amsterdam”. If attendant Peter - which has also been assigned to location “Amsterdam” parks a call, it will be visible in the parked call lists of both Monique and Peter. But if attendant Esther who has been assigned to location “Zeist” parks a call, it will only be visible to the attendants assigned to location “Zeist” and not to Monique and Peter.
Please not that if you don’t assign a location to a user, this user will only see their own parked calls and the parked calls from all the other users who don’t have assigned a location to them.
To configure the Park location go to the Custom data under the User management for each user and fill in the desired location each user will monitor. Only one location can be added.

Pridis
Huis ter Heideweg 56A
3705 LZ Zeist
The Netherlands
+31 85 008 29 00
sales@pridis.com
www.pridis.com