
- Introduction
- Suitable for every SIP-based PABX.
- Priority handling; free choice in which incoming call needs to be handled first.
- Handle incoming calls based on caller information, like VIP, emergency, waiting time etc.
- Multi-operator support allows groups of operators to work together from centralized queues.
- Role based
This manual uses the term attendant to describe the person who is handling the call. Other names might be receptionist, telephonist, operator, or agent.
2. Contact Handling
2.1. Settings
- General
- Favorite tabs
- Panels
Resize panels
On the main page you can drag the divider to resize your panels. However, if you logout and log back in this is not saved.
Available/unavailable
As an attendant, you can put yourself on available or busy by clicking on your avatar at the top right of your screen.
Sign Out
At the top right of your screen, you can see your avatar. When clicking on it you can select the Sign out button to log out of the website.
Collapse/uncollapse
In certain panels you will find the collapse/uncollapse button when pressing one of these buttons, the panel will collapse or uncollapse.
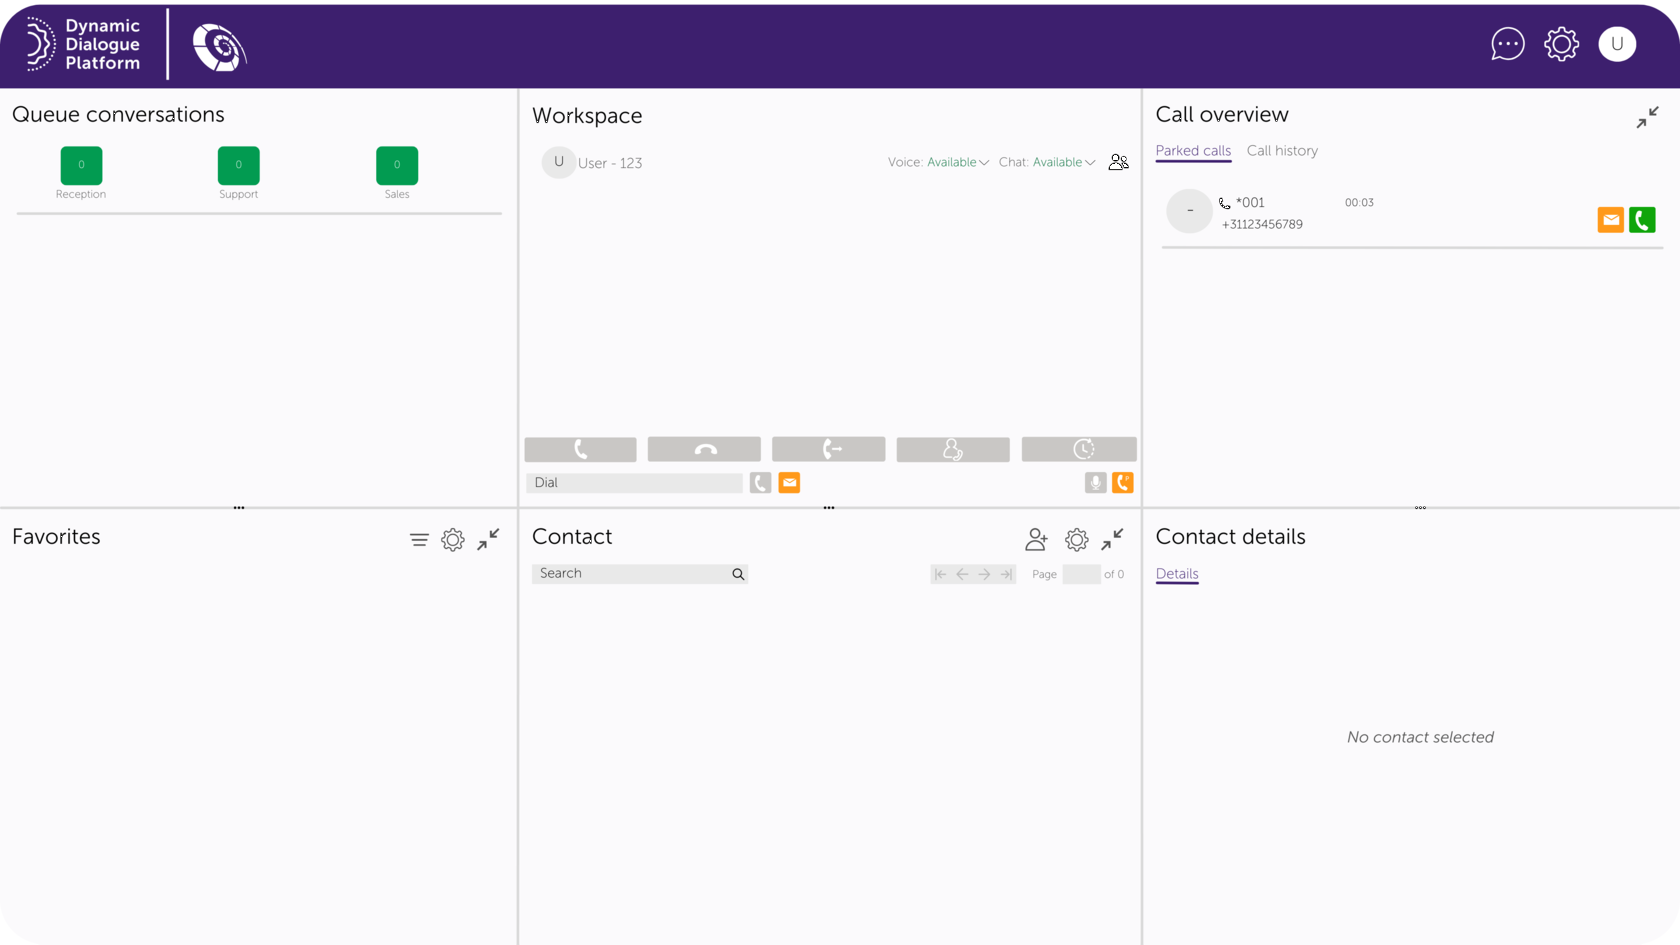
2.2 Panel Overview
- Queue conversations
- Workspace
- Call overview
- Favorites
- Contacts
- Contact details
3. Queue Conversations Panel
Call waiting refers to the total number of calls waiting in line to be answered by all attendants. For each call, the following information is displayed in the grid:
- Time in Queue
Shows a timer that starts when the call arrives in the system. It shows how long the caller is waiting for the call to be answered by an attendant. Note that the timer restarts from zero in case of a recall.
- Name
Name of the caller when the caller's name can be resolved in the directory using the calling line ID.
- Caller
Shows the caller extension or phone number.
- Note
Shows the call note when this has been previously entered by another attendant in the Workspace panel.
- Call Status Indicators
Special status indicators show additional call information such as rerouting or on what attendants this call is currently being offered.
- Call Control Commands
Calls in the queue are either distributed to an available attendant or can be answered straight from the queue. The following commands can be issued to queued calls:
-Direct call pickup: answer directly a call waiting in the overall queue (VIP). This can also be used to retrieve an earlier rejected call.
-Prioritize in queue: this call will be handled by you as soon as you are available (again)
4. Workspace Panel
Displays the phone number of the caller and the name. Whenever possible the name is retrieved from the directory or as defined in the PBX.
Call State
Displays the call direction and other call status details e.g., hold calls, active, or ringing.
Time in Queue
Shows a timer that starts when the call arrives in the system. It shows how long the caller is waiting for the call to be answered by an attendant. Note that the timer restarts from zero in case of a recall.
Call Control Commands
The line indicator offers the following call control functions:
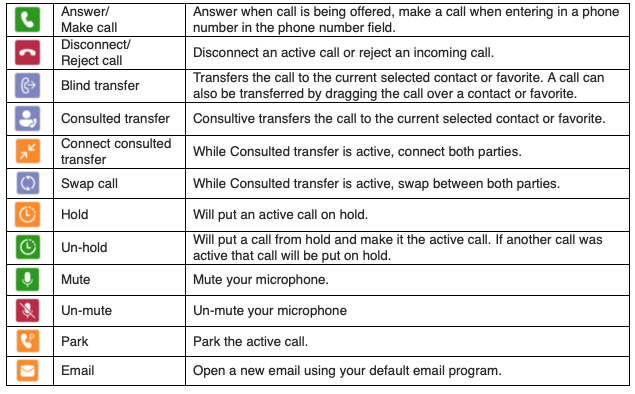
To make an outgoing call enter a phone number in the active phone number field and press the make call button. The make call button is only enabled when a phone number is present in the active phone number box. The active phone number field can also be filled with data from the directory, the favorites, or from the call history.
When a new incoming call arrives, it is shown in the personal workspace. To answer the call, press the answer button.
To hangup an active call press the hangup button. This will disconnect the current active call. Other calls that are parked will stay parked.
It also allows you to reject an offered call. The call is not dropped but is pushed back into the queue and will not be offered again to the same attendant again. The attendant can do a call pickup to retrieve such a rejected call.
To transfer a call to another phone number without first speaking to the other person select an entry in the directory search panel or enter a phone number manually in the active phone number box. Then press the blind transfer button.
It is also possible to initiate a blind transfer by dragging an active call from Workspace to a directory entry, a favorite. The transferred call will be removed from the personal workspace.
To transfer a call to another phone number while first speaking to the other person select an entry in the directory search panel or enter a phone number manually in the active phone number box. Then press the consulted transfer button. This will open a second line appearance in the personal workspace while the current call goes on hold.
If the call has been answered it is possible to switch back and forth to the original caller using the swap call button. To complete the transfer, press the connect consulted transfer button again.
To revert to the original caller without completing the transfer press the hangup button.
To hold the active call, press the hold button. To un-hold the call press the un-hold button.
To mute a call, press the mute button in the call wheel. When your microphone is muted the icon will change. The caller is no longer able to hear you, but you can still hear the caller. To unmute the call, press the mute button again.
Opens a new email in your default email program.
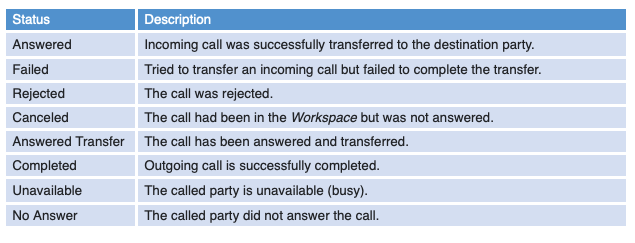
5. Call Overview Panel
The call history panel shows recent calls that the attendant received or originated. When the call has been transferred it also shows the name and department of the transfer destination. The destination can be selected to put it into the active phone number field so that an earlier destination can be easily transferred again.
6. Favorites Panel
Add a contact entry as favorite by searching for the contact entry in the directory search panel. Click on the star and click on the contact group you would like to add to.
Remove a contact entry from the favorites panel by:
- Select the contact entry on the favorites panel. Click on the star;
- Click on the contact group you would like to remove it from;
- Click on the more button* of the favorite entry and click on “Remove from favorites”.
Visible fields can be limited using the settings icon on the panel.
Contact Groups
You can select between your personal contact groups with the contact group button.
7. Contacts Panel
Manual Contact Search
The search window allows you to search for specific contacts in the directory by simply typing a search expression. Any column in the database will be searched for this expression. The search will immediately narrow the grid result down as you type. A search expression can contain multiple fragments, for example "dav sales" will return matching records "David" and "Dave" in the sales department
.
When the grid is populated with the search results the presence indicators for each entry will be shown. It might take several seconds before all presence data is available and all presences are shown. To clear the previous search results, press the clear icon.
Creating a New Contact Entry
Add a new contact entry with the Add Contact button. This opens the directory entry card. When all data has been entered press save to store the new contact in the database. To store a picture on the contact, provide an image URI with the location of the image, for example http://my.company.com/img/141ca0e.jpg.
When creating an entry, it is possible to set the visibility of the contact entry. Items that are visible for yourself only can only be searched, modified and deleted by yourself and by system administrators. Items that are visible to anyone can be searched, modified and deleted by anyone.
Update existing contacts by selecting a directory entry and pressing the more button and then the Edit button. This opens the directory card. Change the required fields or press cancel to leave the card without any change.
To delete the entry, press the more button* and select delete.
*Note: This action will only remove the contact entry from the favorites panel. It is still present in the database and will show up in subsequent directory searches.
From the contact card action can be started such as making a new call, transferring a call, or composing a templated email.
To initiate a new call to a contact either:
- Left click a phone number on the contact card and click make call;
- Or click the contact card and initiate the call from the workspace.
To blind/consulted transfer a call to a contact either:
- Select a contact card and press the blind- or consultive transfer button from the workspace;
- Left click the phone number and press the blind/consulted transfer button;
- Or drop the call from My Workspace on the contact, to blind transfer a call.
To send a templated email click the email button on the contact card. For more details see Send Email.
Open Contact Detail
When selecting a contact card, a detailed view is opened in the contact details panel.
Add or Remove from Favorites
Contacts can be added to the favorites panel by clicking on the starand selecting the desired contact group to add the contact to that group. and selecting the desired contact group to add the contact to that group.
Contacts can be removed from the favorites panel by clicking on the star and selecting the desired contact group to remove the contact from that group.
Edit or Delete a Contact
A contact can be edited by clicking the more button and selecting edit. By doing so, a contact edit panel will appear. Change the required fields and press save or press cancel to leave the card without any change.
A contact can be deleted by clicking the more button and selecting delete.
8. Contact Details Panel
The schedule table shows the MS Outlook calendar of the selected contact entry from the directory or favorites. The appointments can be displayed per day or for an entire week. By default, the panel opens with the current day and time visible.
Pridis
Huis ter Heideweg 56A
3705 LZ Zeist
The Netherlands
+31 85 008 29 00
sales@pridis.com
www.pridis.com